3.27.2010

artichoke tapenade.

Where did March go? Well, I know that at least part of mine went to Albuquerque for a conference. I had looked forward to some food tourism, but...let's just say most of my meals weren't really worthy of being commemorated in any way. Instead:


Now happily back home, I'm catching up on my backlog of food-to-be-blogged. First up: an artichoke tapenade adapted from this one at Smitten Kitchen. I added some zing with lemon and some freshness with parsley, and it's deliciously addictive. The measurements are all approximate, so you can also play with the proportions to suit your taste.

(*Disclaimer about lighting: when I can, I conduct my food photoshoots in natural light, since the lighting in my apartment at night is rather yellow. This isn't, sadly, a dish that photographs particularly well at any time. But it looks fine in person and tastes even better!)


Artichoke Tapenade

1 15-oz. can of artichoke hearts, drained and broken up a bit
1-2 tbsp. capers
1 c. green olives
1 clove garlic, chopped roughly
1 tbsp. chopped fresh parsley
Zest of 1 lemon
Juice from half a lemon OR about 1 tbsp. white wine vinegar
Salt and pepper to taste (Hint: add salt gradually, since the capers make it fairly salty anyway.)
Scant 1/4 c. olive oil (Use more or less depending on the texture you want.)

1. Blend all ingredients except the olive oil in a food processor until coarsely chopped. Taste at this point to see if you want to adjust the proportions for any ingredients.

2. With the processor running, pour oil in a steady stream, as you would with pesto. Process more or less to get the desired texture. I like it on the coarse side.
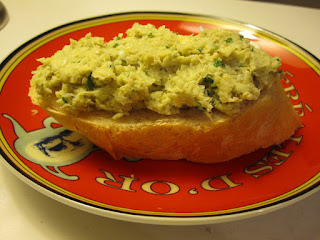

This will feed anywhere from 2 to 6 people, depending on their love for artichokes. (Mine is intense.) It's perfect on bread, but I'm also looking forward to trying it on pasta.

3.09.2010

peanut butter frosting.

This year, I was invited to an Oscars party with an intriguing challenge: bring an appetizer or dessert honoring the oeuvre of Sandra Bullock. Among such creative - and delicious - entries as pecan sandies, "Two Leeks' Notice" leek tarts, and "While You Were Steeping" Earl Grey shortbread, I submitted "The Cake House." Chocolate cake with peanut butter frosting, topped with a house drawn in chocolate because I can't resist the opportunity to use my decorating set whenever possible.


Although I made a sheet cake this time for ease of transportation, this frosting is lovely on cupcakes. (I don't covet a cupcake-carrier as much as I covet an apartment with the space to store a cupcake-carrier.) Also, I cheated and used a chocolate cake mix for reasons of time and available ingredients, but the frosting is so wonderful that the cake really plays a supporting role anyway.


Kathleen's Peanut Butter Icing
from Barefoot Contessa at Home

1 c. confectioner's sugar (*I use a scant cup)
1 c. creamy peanut butter
5 tbsp. unsalted butter, at room temp.
3/4 tsp. vanilla extract
1/4 tsp. kosher salt
1/3 c. heavy cream

1. Beat all ingredients except the cream at medium-low speed (*the KitchenAid is great for this, but I'm sure it would work just as well with a hand mixer) until creamy, scraping down the bowl with a rubber spatula as you work.

2. Add the cream and beat on high speed until mixture is light and smooth.


This makes enough for 24 cupcakes or one sheet cake.

Chocolate Icing

In case you're curious about the piped chocolate icing on top, all I did was melt about 4 oz. of dark chocolate in the microwave on 30-sec. intervals, stirring frequently so it doesn't burn. (A double-boiler would obviously work as well; this was faster.) Once it was melted, I added glug of heavy cream left over from the frosting; stirring thoroughly thickened it up into a sort of ganache, firm but not too stiff to pipe.


Then I just spooned it into a pastry bag fitted with a small circular tip and started doodling. (I've also done this on the rims of dessert plates for special occasions.) It hardens fairly quickly.

3.07.2010

butternut soup.

When yesterday I realized I had a few butternut squash rolling around that needed to be used, it was an easy decision to make soup out of them. Given our spring-like temperatures, of course, it seems a bit off-season, and this will probably be the last batch I make this winter. But it's a great way to use up any last squash you have lying around, and there's always next fall's squash to look forward to!

Winter Squash Soup
from Barefoot in Paris

2 tbsp. unsalted butter
1 tbsp. olive oil
2 c. chopped yellow onions (2 onions - *I use 2 small or 1 1/2 large)
1 15-oz. can pumpkin puree (not pumpkin pie filling)
1 1/2 lb. butternut squash, peeled and cut in chunks (*a 2-lb. squash works well)
3 c. chicken stock/broth
2 tsp. kosher salt
1/2 tsp. freshly ground black pepper
1 c. half-and-half


1. Heat the butter and oil in a stockpot; add the onions and cook over med-low heat for 10 minutes, or until translucent. (*Don't rush the onions! The soup has a much more well-rounded flavor if you let them cook the full time.)

2. Add the pumpkin puree, butternut squash, chicken stock/broth, salt, and pepper. Cover and simmer over med-low heat for about 20 minutes, until the butternut squash is very tender. (*Depending on your squash, this might take closer to 30 minutes.)


3. Process the mixture through the medium blade of a food mill. (*This was the first time I'd actually used a food mill. I normally use a food processor, pureeing the soup in batches until it's smooth but not too watery; I think that I actually like the results from the food processor better as it seems to give the soup a more integrated texture than the mill.)


4. Return to the pot, add the half-and-half, and heat slowly. If the soup needs more flavor, add salt to taste.


Makes 4 servings, according to Ina, though I usually get at least 5.

3.03.2010

mushroom soup.

This soup is something of an ongoing experiment. My mom adapted it slightly from a 1970s issue of Bon Appetit kept from when she and my dad were first married, and I've tweaked the recipe a bit further. It seems like it would lend itself to further experimentation: a splash of white wine, perhaps, or maybe some caramelized leeks. Different varieties of mushrooms might also be interesting. Hmm. As is, this is a satisfyingly creamy mushroom-packed soup that is a cinch to make and only gets tastier as it sits. (In fact, I made it a few hours ahead and then reheated it for dinner; the additional time lets it thicken and brings out the sherry.) With a big green salad on a gloomy-gray weeknight? Yum.

Mushroom Soup
adapted from Bon Appetit and Mom

20 oz. mushrooms, sliced*
4 tbsp. butter, divided
1/2 c. finely-chopped onion
Kosher salt to taste
4 - 5 tbsp. flour
10 - 14 oz. chicken broth
2 - 3 tbsp. sherry
1 1/2 c. milk

*Note on the mushrooms: The original recipe calls for a pound of mushrooms. Since it's easiest to find 10-oz. packages of cremini (baby bella) mushrooms, I just use two of those. I like to chop them finely with the slicing blade of my food processor (see below) but the soup would also work if they were more coarsely chopped.


1. Melt 2 tbsp. butter and cook the onions for 2 minutes at med-low heat. Add the mushrooms and a pinch of salt and cook ~8 minutes, until they've let off some of their liquid but aren't too cooked down. Set aside. *Note: In order not to crowd the mushrooms, I do this step in two pans, dividing the butter, onions, and mushrooms between them. More dishes, yes, but better results.

2. Melt the remaining 2 tbsp. butter in a large saucepan, then whisk in the flour. Off the heat, add the chicken broth and the sherry; return to med-low heat and whisk until smooth and slightly thickened, about a minute.

3. Stir in the milk and mushrooms (if your mushrooms have let off a large amount of liquid, you might want to strain some of it out to avoid a watery soup), then add salt and/or more sherry to taste. Let the soup cook on low heat, stirring frequently for 5 minutes or so, to let the flavors blend.

A sprinkling of fresh parsley before serving brightens up the flavor.


Makes around 4 servings, depending on additional broth/milk.

The soup will thicken as it cools; these measurements of broth and milk yield a fairly thick consistency, particularly when reheated. (The original recipe called for 2 c. milk but I found that too, well, milky.) I might decrease the flour and increase the chicken broth to thin it a bit, especially if serving it as an appetizer. I did use skim milk and found it quite rich enough, though you could probably add a glug of whatever you have on hand and adjust the broth accordingly.

I'll continue to play with this one; if you make some adjustments of your own, please let me know!

2.26.2010

ginger cookies.

I adore Ina Garten - her show, her kitchen, her explanation of techniques, her recipes, her general love of food. She is my favorite stop for cookbook pleasure-reading as well as the one I turn to for recipes that will inevitably turn out well. So when a fabulous foodie friend made her own gingersnap recipe for my birthday celebration last month, I was inspired to try the recipe below. These are different from gingersnaps because they're chewy, and they're also full of crystallized ginger for an intense flavor. As Ina herself loves to say, how bad could that be?

Ultimate Ginger Cookie
from Barefoot Contessa at Home

2 1/4 c. all-purpose flour
1 tsp. baking soda
2 tsp. ground cinnamon
1 1/2 tsp. ground cloves (*I used 3/4 tsp., which was sufficiently clove-y)
1/2 tsp. ground nutmeg
1/2 tsp. ground ginger
1/4 tsp. kosher salt
1 c. dark brown sugar, lightly packed
1/4 c. vegetable oil
1/3 c. unsulfured molasses
1 egg, room temp.
1 1/4 c. chopped crystallized ginger (6 oz.) (*Coarse or fine pieces both work; your choice)
Small bowl of granulated sugar (for coating the cookies)

1. Preheat the oven to 350F. Line 2 sheet pans with parchment paper.

2. Sift together the flour, baking soda, cinnamon, cloves, nutmeg, ginger, and salt; combine well.

3. In an electric mixer with the paddle attachment, beat the brown sugar, oil, and molasses on medium speed for 5 minutes. (*You could probably make this with a handheld mixer, but it's a very wet, heavy dough that even makes my beloved KitchenAid mixer work hard.) Turn mixer to low speed, add egg, and beat for 1 minute. Scrape the bowl, beat 1 more minute.

4. With the mixer on low speed, slowly add the dry ingredients, then mix at medium speed for 2 minutes. (*It might seem like the dough will be too dry - not to worry. Once the dry ingredients are mixed in thoroughly, the dough will hold together beautifully.) Add the crystallized ginger and mix until combined. (*As you can see here, the dough isn't all that pretty. But it will be delicious.)


5. Scoop out the dough and roll with your hands into a ball. (*Ina says a 1 3/4-in. ball. Mine looked about the size of overgrown golf balls, if that helps.) Flatten lightly into a disc with your fingers, then press both sides of the cookie in the bowl of granulated sugar before placing it on the sheet pan. (*These cookies don't spread very much, but because they don't make that many, you don't need to crowd them. I fit between 9 and 12 per sheet.)

6. Bake exactly 13 minutes. (*I rotate the pans halfway through for even browning.) They'll be just a bit crackled on top and browned on the bottom; they might feel too soft, but they'll harden as they cool. Cool on the sheets for a minute or two, then transfer to wire rack to cool completely.


[Makes 16 cookies according to Ina, though I've managed 22 with 1 batch and 18 with another. 18 seems to work well; many more and I think you lose the wonderful chewiness of the larger cookie.]

2.25.2010

preface.

Mrs. Bennet, with great civility, begged her ladyship to take some refreshment; but Lady Catherine very resolutely, and not very politely, declined eating any thing; and then rising up, said to Elizabeth,

"Miss Bennet, there seemed to be a prettyish kind of a little wilderness on one side of your lawn. I should be glad to take a turn in it, if you will favour me with your company."

"Go, my dear," cried her mother, "and shew her ladyship about the different walks."

Jane Austen, Pride and Prejudice

Last fall, a dear friend was reading Pride and Prejudice; she remarked that Lady Catherine's phrase would make the perfect title for a blog. Not only was I TAing for a Jane Austen course at the time, but P&P is also a novel that I re-read over and over again, basking in its diction, chuckling at its snarkiness. So I laughed, agreed, and filed the idea away, not entirely intending to follow through on it. But it gradually, unexpectedly, snuck up on me and became something I was excited about. Became, well, this.

"A prettyish kind of a little wilderness" - it seems such an apt title for a blog. (Thanks again, B., for the phrase. And thanks too to M. for the set-up help.) For in Austen's context of eighteenth-century landscaping, "wilderness" means not an uninhabited desolate space but a section of garden carefully designed to look wild. (Closely-set trees, intricate mazes, perhaps a faux-ruin. You get the picture.) In a way, this blog will, I hope, become its own kind of wilderness: a hodgepodge of recipes, photos, miscellaneous snippets planted (er, posted) carefully, one at a time, eventually to form a pleasing space.

So thanks for taking a turn.