I've been basking in the fall weather; the return of crisp mornings and wool scarves puts me in the mood for afternoon walks, pumpkin beer, pumpkin anything, candy corn, butternut squash, and crafty projects. (I'm working on one now and have the sandpaper scrapes to prove it. You'll see it soon.) So when these Pumpkin Pie Pop Tarts came up recently on Joy the Baker, they jumped straight to the top of my to-try list.
The weather also propels me into high stock-up-for-winter mode, which means I've been making my very own applesauce for the first time. I've been making it for years with my mom in the same creaky food mill; after I received one of my very own last year for Christmas, I decided to stock up on my own supply. I used about 9 pounds of apples from my favorite market stand: mostly Cortlands, with a few each of Granny Smith, Gala, Jonahgold, Empire, Mac, Golden Delicious, and Fuji. Quartered, they cook cook down with a bit of water in a big pot, then go through the food mill to remove skins, seeds, and stems, then get flavored with the juice of a lemon, about a tablespoon of sugar, and several generous shakes of cinnamon. And that's it! So delicious-smelling! So addictively satisfying! I've made two batches so far.
But I digress. I decided to break out the pop tarts for a pre-Mad Men-season finale dinner last weekend. J. made pasta all'amatriciana (spicy! yummy!), M. made roasted butternut squash, and Viola guarded the wine.
The pop tarts were quite good and, as a bonus, they travel very well. Joy the Baker's original recipe calls for a maple glaze, but I was afraid of sickening sweetness. (Also not a huge fan of maple-flavored things.) As it turns out, these tarts are quite rich enough on their own. I might serve them with a bit of whipped cream, flavored with almond extract, maybe, or vanilla ice cream for something decadent. I found it a bit fiddly to roll out the dough into rectangles of a certain size, in part because of my lack of patience/counter space; I might use a circular cookie cutter (I know, pop tart sacrilege!) next time to avoid the hassle. I did like the pretty crimped edges I got from using my pastry cutter. Overall, these were rich, autumny, and cute to look at. If I were grading them, they'd receive a distinguished pass in all four categories. (If you don't know what I'm talking about, congratulations. If you do, well, I'm sorry. Make these. They're a good procrastination tool.)
Pumpkin Pie Pop Tarts
adapted from Joy the Baker
Crust:
2 c. all-purpose flour
1 tbsp. sugar
1 tsp. salt
1 c. (2 sticks) unsalted butter, cold, cut into cubes
1 egg
1 tbsp. milk
1 egg, beaten (for egg wash)
Filling:
3/4 c. pureed pumpkin
1 egg
1/8 tsp. ground cloves
1/4 tsp. ground ginger
1/2 tsp. cinnamon
1/4 tsp. salt
2 tbsp. brown sugar (*The original calls for 1/3 c. white sugar.)
Make crust:
1. In food processor, pulse flour, sugar, and salt until combined. Add butter and pulse until mixture is coarsely blended, with no butter larger than a small pea.
2. In small bowl, whisk together egg and milk. Add mixture all at once to flour mixture and pulse until combined and mixture comes together into a ball. (You could also do these two steps with a bowl and your fingers or a pastry cutter.)
3. Lightly flour clean countertop; turn out dough and knead a few times until it comes together. Divide dough in two and wrap each flattened ball in plastic wrap; refrigerate for about 30 mins.
Make filling:
4. In small saucepan, heat pumpkin and spices just until spices are fragrant. (*Really, you could probably omit this step.) Remove from heat and place pumpkin mixture in med. bowl. Whisk in egg, sugar, and salt. Put in fridge while you roll out the dough.
Assemble tarts:
5. On well-floured work surface, pat one ball of dough into 3x5" rectangle, then roll it out to about 1/8" thickness. You should have a rectangle slightly larger than 9x12"; trim edges with a pizza or pastry wheel to 9x12" exactly. Then cut each side into 3 sections, creating 9 rectangles. Place these in the fridge while you roll out the other ball of dough in the same way.
6. Brush one set of 9 rectangles with beaten egg. (This forms a glue for the top layer.) Spoon about 1 tbsp. of filling onto the middle of each rectangle; spread slightly. Top with another dough rectangle and crimp edges closed with a floured fork. Use fork to create vent holes in top of tart.
7. Preheat oven to 350F; let tarts rest in fridge while oven heats. Bake for 25-30 mins., until golden brown on top. Remove tarts from pan and let cool on wire rack. [Glaze optional; recipe here.]
10.23.2010
10.17.2010
s'more pie; or, adventures with the broiler.
If I don't see a saltine again for about 18 months, that would be fine. I spent last week with a beast of a stomach flu. It was bad. Reading-my-favorite-food-blogs-was-too-much-for-me-to-handle bad.
Thankfully, though, I'm on the mend and gleefully returning to my kitchen. Starting with this: S'more Pie from SmittenKitchen, adapted in turn from Gourmet. I glumly tucked this recipe away in my bookmarks back in the summer, knowing that I'd need a far cooler kitchen to attempt made-from-scratch marshmallow topping. Fall weather, you are so very welcome.
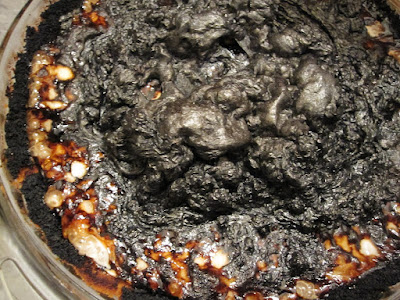
This pie was quite tasty. It was also perhaps the most pathetic-looking dessert I've ever produced. You see, the recipe called for the pie to be browned in the broiler, but I've always been intimidated by the broiler drawer of my oven (I had the same model in my old apartment, too). That's why I own a culinary torch. Alas, my torch was out of gas. I really wanted an authentic browned topping on the pie, though, so I decided to brave the dreaded broiler drawer. How bad could it really be? Well ... behold:
That's right. My beautiful pristine marshmallow topping turned into THAT. It went something like this:
[After the pie has been in the broiler drawer for about a minute.]
A. sniffs. "Hmm, it smells like maybe it's browning too quickly." Casually strolls to oven; slides out drawer and sees disaster; wails. Remembers over-active smoke detector and runs into bathroom [knows from experience that this is the only room without a smoke detector] clutching pie and calling out, "Trivet! Trivet!" Slams door and turns on bathroom fan.
K. knocks on bathroom door with a trivet. A. and K. leave pie on bathroom floor with fan running, emerge to find M. standing on armchair waving a pack of mailing envelopes in front of smoke detector and D. vigorously swinging apartment door back and forth in an effort to clear the air. [A.'s wonderful friends are experienced at smoke-alarm evasion.] Alarm averted. Pie is still served up in the bathroom.
As it turned out, the blackened topping was kind of delicious - burnt marshmallow! Very authentic. And although I'm never ever attempting to use my broiler in the future, I'll be making this again. Or should I say, s'more?
S'more Pie
adapted very slightly from smittenkitchen, adapted from Gourmet (Nov. 2006)
Crust:
5 tbsp. butter, melted
10 graham crackers, finely ground (~1 1/2 c.)
1/8 tsp. salt
Chocolate filling:
7 oz. bittersweet or dark chocolate, chopped finely
1 c. heavy cream
1 egg at room temp.
pinch of salt
Marshmallow topping:
1 tsp. unflavored gelatin
1/2 c. cold water
3/4 c. sugar
1/4 c. light corn syrup
1/2 tsp. vanilla
Make crust:
1. Preheat oven to 350F. Lightly butter a 9" or 9.5" pie plate. Stir together crust ingredients in bowl, then press evenly over bottom and up sides of pie plate. (*I find that a small bowl with roughly parallel lines helps to make the sides secure.) Bake until crisp, 12 to 15 mins., then cool to room temp., about 45 mins.
Make filling:
2. Bring cream just to a boil in heavy saucepan, then remove from heat, add chocolate to pan and let stand for 1 min. Gently whisk until chocolate is melted and mixture is smooth. Gently whisk in egg and salt until combined, then pour into cooled crust. Cover edges with foil and bake about 25 mins., until mostly set but center wobbles slightly when shaken. (It will firm up as it cools.) Cool pie on rack until room temp., about 1 hour.
Make marshmallow topping:
3. Stir together sugar, corn syrup, pinch of salt, and 1/4 c. water in heavy saucepan. Bring to boil over moderate heat, stirring until sugar is dissolved. Boil for about 6 mins. or until candy thermometer reaches 260F. (*I don't have a candy thermometer, so I boiled it for about 6 mins. This may not have been quite enough for entirely firm marshmallows but it worked out fine.)
4. Sprinkle gelatin over remaining 1/4 c. water in bowl of KitchenAid mixer with whisk attachment; let stand 1 min. Then, with mixer running at medium speed, slowly and carefully (!) pour in hot syrup, avoiding whisk. When all of syrup is added, increase speed to high and beat until mixture is tripled in volume and thick, about 5 mins. Add vanilla and beat until combined.
5. Immediately spoon topping onto cooled pie; it will slowly spread out. Chill uncovered for 1 hour, then lightly cover with greased plastic wrap and chill 3 hours more.
6. Brown topping in broiler for 3 mins. (*at your own risk!) or with culinary torch. Rinse knife between cuts if necessary.
*Note: Before browning, pie can be chilled for up to one day.
Subscribe to:
Posts (Atom)